Comfy Comfy Canada Cold/Hot Packs

*NOTE – this post contains affiliate links, and the item being reviewed was gifted to me for review purposes. It is being raffled off in the Migraine Survival Kit Giveaway with other fabulous products!

hot pack2Anyone who knows me knows that I have, and use, a LOT of hot/cold packs. I use them cold from the freezer for migraines and injuries, and hot for Irritable Bowel Syndrome flare-ups, back pain, and shoulder/neck pain. I have Fibromyalgia, Osteoporosis, and Arthritis, as well as a shoulder injury, neck injury, and knee problems, and I also get a lot of migraines.

I used to make my own hot packs out of regular flame-retardant flannel and wheat berries, and bought a few to see if they were better than mine, but when I found the Comfy Comfy Canada cold/hot packs, I knew I’d found my solution.

hotpack shoulders

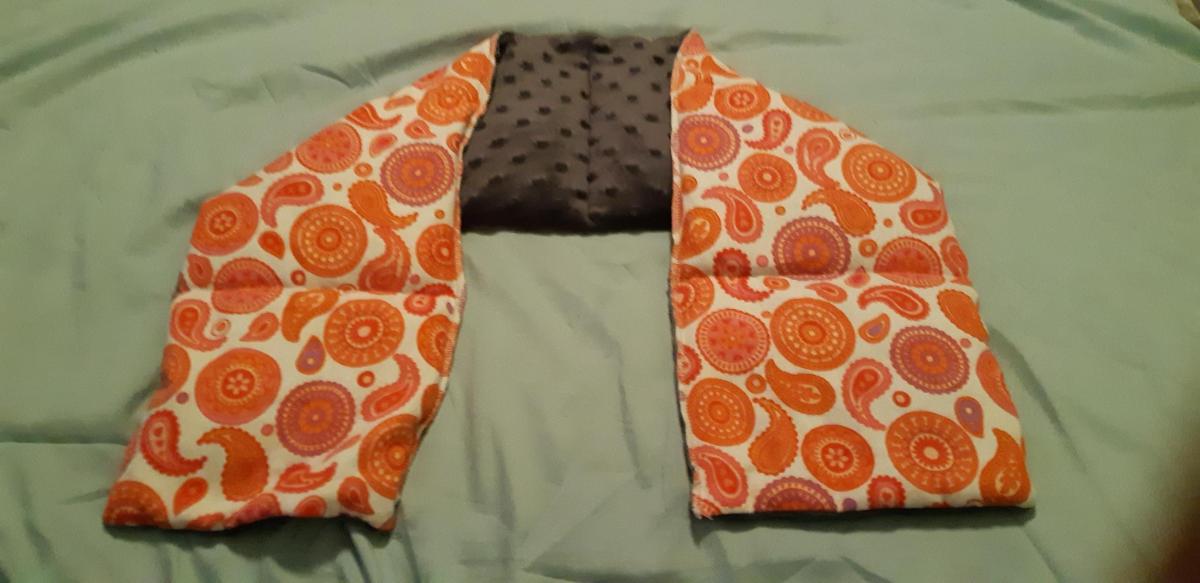
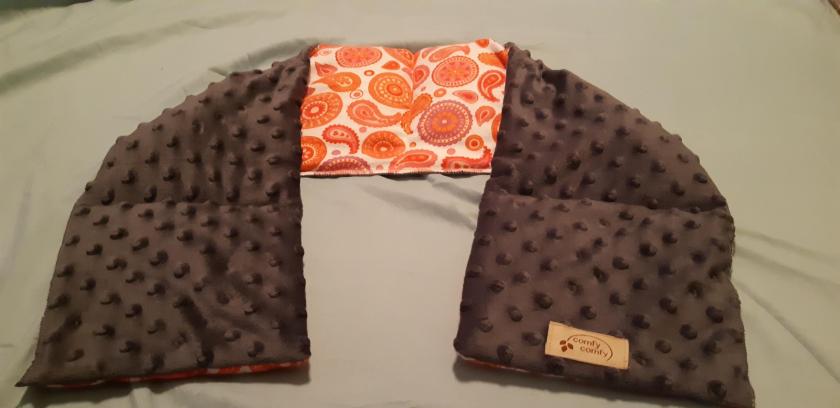
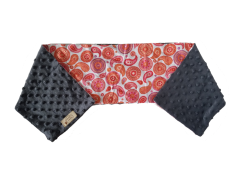
The first major difference between this cold/hot pack and the others I’ve tried is the soft Minky fabric. Minky is a thicker fabric, and it feels like butter. It’s ultra-soft, and the extra thickness allows you to heat the pack up a little hotter than flannel packs, as the fabric acts as a buffer between the heat and your skin. This also means the pack stays hot longer. When it feels cooler, I flip it over to the flannel side and the thinner fabric allows more heat to come through. While I do have a Serger (Minky is thick, so difficult to sew on a standard machine) it’s really not worth it to me to go buy 4 spools of the same colored thread and go through the process of threading and setting up the serger just for a few hot packs. Minky also isn’t cheap, so at the low price that they offer these hot packs at, I don’t have to figure out how much Minky to buy and sew it – the price is definitely worth the purchase vs. making it myself.

Another difference between this, and other hot packs, is the length and width. This hot pack is so much longer, and wider, than traditional hot packs that it’s very, very versatile. Wrapped around my neck, it also provides heat over my shoulders, and being so wide, it covers more of my shoulders than the skinnier packs sold in drug stores.

hotpackbellyIt’s also much lighter-weight, being filled with Flax seeds rather than other fillers, and stays warmer longer. The size really comes into play for me when I have the severe stomach pain that goes along with IBS flare-ups, as I can double it up to fit on my tummy, adding more weight to help confuse pain signals. Staying doubled-up also means that it will retain its heat longer (especially if under blankets), which means fewer trips to the microwave to reheat it. It seems to stay warm for about 45 minutes, but when I fold it like this, then turn it around and fold it so that the paisley flannel side is facing out, I find that it’s still hot on the inside, extending the length of time it stays hot! I’ve literally gone to bed with it under the blankets at night, and woken up and it still feels somewhat warm (could be from body heat and heat trapped under blankets, but it’s a nice bonus to have in the bed on cold nights!). I also use it to wrap around my feet to warm them up! It’s the only hot pack that would ever properly wrap because of its extra-long size!

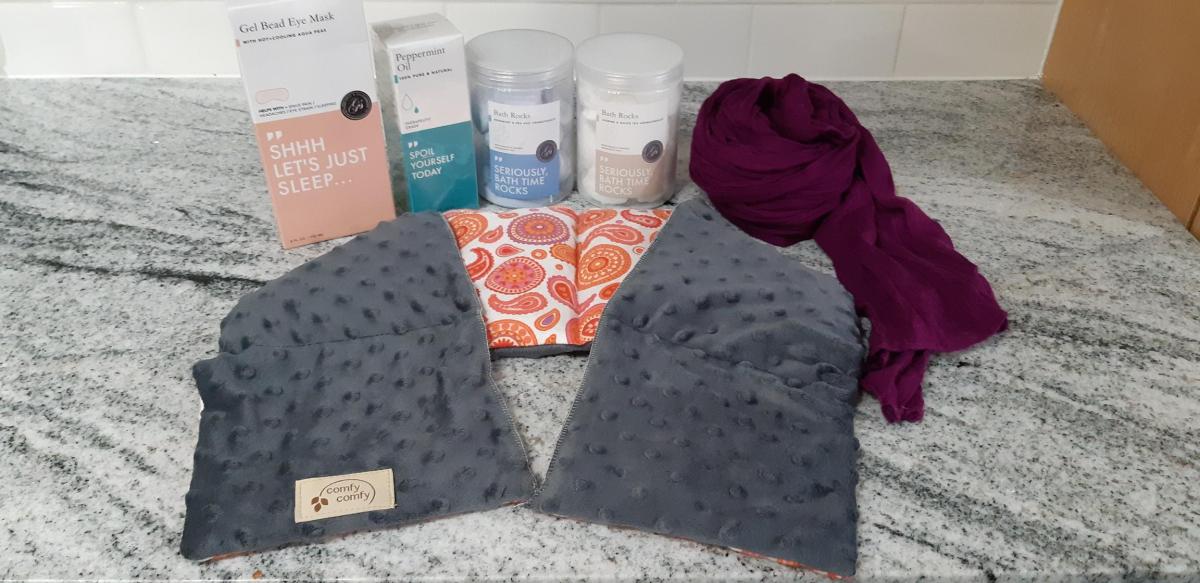
We’ve talked about hot, now let’s talk about cold. I get so many migraines each month it’s hard to keep track. All I know is I go through a LOT of ” target=”_blank” rel=”noopener”>eye gel bead masks and cold/hot packs. I’m constantly rotating these packs through the freezer, so I have several on hand. This one is so much nicer than your typical cold pack for migraines. Because it’s light-weight, it doesn’t contribute to my migraine, it shapes much better to my head than fuller, thicker cold packs, and because of its length, it covers more of my head and actually stays put. I find it so annoying when I have to keep re-adjusting my cold pack when I have a migraine! It seems to stay cold longer than any others that I’ve tried (and I’ve tried a LOT), so it’s win-win for me! They’re also great for any injuries, and my kids use them frequently for boo-boos and injuries.

Like what you see? If you order before November 30th, Comfy Comfy Canada has offered a discount of 15% by typing in the code TESSAG15 at checkout! They also have buckwheat pillows, meditation pillows and more, as well as a square version of this hot/cold pack, and several different patterns! If you haven’t already registered to win this one, subscribe to my blog, and click the link  for several chances to win the Migraine Survival Kit Giveaway. To order this or other products made by Comfy Comfy Canada, click here.


Work Out With Me Wednesday #2

Good morning to all of you!

I hope you had a great week starting to get moving with WOWMW #1! If you ever have any questions, please feel free to post in the comments or to contact me directly, I’m always here to help out!

Before we get into this week’s workout, a few quick words. If you are NEW to these workouts, then WELCOME! If you haven’t done WOWMW #1, then start there, and you can continue to follow along week-to-week. As the song goes in The Sound of Music, “Begin at the very beginning, it’s the very best place to start!” It’s very important to start slow, as it’s so easy to injure yourself, cause a muscle to tighten up, or overdo it when you’re just starting out. *All images are the property of Physiographe.

So, without further ado, here is this week’s workout!

We’re going to keep 1 of the stretches from week 1, because it’s a great back stretch, so let’s start with that:

flex-11

This is our ‘cow’ and ‘cat’ position. As you raise your head to get into the first position, breathe out slowly. Then, slowly arch your back like a cat, lowering your head to look at your knees, and breathe in. Repeat this as many times as you think you can; this week, we’re going to go for 5 repetitions with this one; if you’ve been doing 10, you can stick with that.

Neck Stretches

flexA_neck-03

If you’ve been sedentary, or mostly sedentary, it’s really important to start stretching out your neck and shoulder muscles. In this exercise, it may help you to do this in front of a mirror. Start with your head aligned with your shoulders, and move it forwards and slightly down. Keep your shoulders back, don’t let them hunch forwards. You will feel a stretch in your neck and at the top of your shoulders. Start with 3 or 4 repetitions if you’ve been largely sedentary; you can do 6-8 if you’ve been a little more active.

flexA_neck-05

We’ve all seen or done this one before! Believe it or not, you can really mess up a muscle in your neck or shoulder (trapezius) if you’re not careful on this one. Make sure that your shoulders are back, and gently tilt your head to one side until you feel a stretch. You do not want to push that stretch to the point of discomfort right now! That’s when you’ll get a knot in your shoulder, which can cause serious headaches and shoulder pain. Switch to the other side. Try to repeat this one 3 times on each side. Hold each stretch for 20-30 seconds. This will allow that muscle to relax.

Shoulder Flex

flexB_shldr-07

For this stretch, you’re going to need a chair. Place your feet about shoulder-width apart, and far enough away from the back of the chair that you can get a good 90 degree angle between your legs and torso. Extend your arms in front of you and lightly grasp the back of the chair. Keeping your hips as straight as possible, turn so that one shoulder is pointing as much toward the ceiling as you can, hold for 20 – 30 seconds, and repeat on the other side. Check your posture throughout to ensure you’re not twisting your hips as you do this. Repeat 3-4 times/side.

Leg Stretch

flexD_leg-62

Instead of laying on a bed or table as depicted in the image, lie on your yoga/exercise mat, with both legs extended in front of you. Raise one leg and grasp the back of it, pulling it in towards your chest as far as possible. You may feel no stretch, or you may feel a leg stretch, and you may even feel a bit of a stretch in your lower back. That’s okay. Just keep your head and shoulders relaxed on the mat, and don’t stretch to the point of discomfort. Hold for 20-30 seconds, aim to repeat 3-4x/side.

THIS WEEK’S CHALLENGE!

This week, try to intersperse WOWMW #1 with this workout – one day do #1, one day do #2. Aim to do them every day, or at least 5 days/week. It doesn’t take very long, and you’ll feel so much better as we begin to move into stretching out our whole bodies, and then progress into some strengthening. Keep a journal of each day’s workout, to keep you accountable. You can do this on your computer with Excel, or, if you prefer, write it on your calendar, or in a notebook. This way, you’ll be able to track your successes, figure out your weak areas, and be able to pat yourself on the back for every day that you took the time to do something for your fitness!

Until next week, take care, and have fun!


My “Hey, It’s Okay!” Post for Airing My Dirty Laundry Blog

So the author of the blog, “Airing My Dirty Laundry” got the idea for a linkup, and I thought it fit in perfectly with my niche(s), so here we go!

Hey, It’s Okay…

-to take a nap in the middle of the day because I’m having a fibromyalgia flare-up, and I’m just plain exhausted!

-to spend an afternoon watching Netflix because my body hurts so much from a flare-up that I just can’t haul myself out of bed to accomplish anything useful!

-to act silly when the kids help me rake leaves, and end up destroying our neatly-raked pile completely by jumping and rolling around in our pile!

-that my son got a 60% on that math test, because I know he really did work hard and try his best, and it’s only the beginning of the year

-that I spent that extra money buying my Macbook Air instead of a Windows laptop, because I just can’t wrap my brain around Windows!

-that I just bought a $2500 motorized recliner with a motorized, tilting headrest, because I have FM, Osteoporosis, and arthritis, and dammit, I’m tired of using hundreds of pillows to find ‘just’ the right position!

-that my son didn’t eat his lunch today, because he ate a big dinner!

-to buy that chocolate-dipped sprinkle-covered ice cream cone from the Ice Cream truck that came by the other day, because my children have NEVER seen an Ice Cream truck before!

I’d love to hear about you! If you were to make a ‘Hey, it’s Okay’ list, what two things would be at the top of your list?

Migraine Survival Kit GIVEAWAY!

Yes, you read that right – A GIVEAWAY!

On October 15th, I will be giving away a Survival Kit full of items to help one of you wonderful subscribers survive those migraines. If you don’t get migraines, these products can all be used for other purposes, so don’t worry, if you don’t get migraines, they’ll still be beneficial to you. Each item was donated to me for review by the companies that make them, except the migraine scarf, however, EVERYTHING IS BRAND-NEW! I’d already ordered these items for myself, and loved them so much I collaborated with the companies involved to get some items for review & giveaway! If you want to read more about how these products are used to help alleviate migraine pain, check out my post on Managing Migraines Without Medication. To be eligible for the draw, you MUST be a subscriber to my blog, and you can earn extra entries by clicking on the GIVEAWAY link in the first sentence of the post! The more you share, the more entries you get, but even if you click the link, remember, you MUST be a subscriber to be eligible!

What’s in the Basket?

-Grace and Stella Bath Rocks in your choice of Rosemary or Jasmine

-Grace and Stella Large Bottle of Peppermint Oil

-Grace and Stella cooling eye gel bead mask

-Comfy Comfy Canada hot/cold flaxseed pack

-Migraine ‘scarf’

What’s in the Basket?

-Grace and Stella Bath Rocks in your choice of Rosemary or Jasmine

-Grace and Stella Large Bottle of Peppermint Oil

-Grace and Stella cooling eye gel bead mask

-Comfy Comfy Canada hot/cold flaxseed pack

-Migraine ‘scarf’

Links to Products:

Grace and Stella Bath Rocks – When I first got the Rosemary Bath Rocks, I thought they were going to smell weird, or strong. The very opposite is true – these bath rocks smell absolutely heavenly, and although I LOVE the smell of Jasmine, I actually prefer these to the Jasmine rocks! Not only are they fabulous, but they are also very inexpensive! Click on the image to go to Amazon for more information. *note: I get a small commission if you buy these through this link.

Grace and Stella Peppermint Oil – This peppermint oil is useful for dabbing on your temples when you have a migraine, and then I recommend tying a migraine scarf tightly around your head making sure to cover your temples, then using a cold pack such as Comfy Comfy Canada’s cold pack that is in the gift package, and/or the Grace and Stella cooling gel bead eye mask.*note: I get a small commission if you buy these through this link.


Grace and Stella Cooling Gel Bead Eye Mask – So, this mask. I had picked up about half a dozen gel masks from the dollar store and Bed, Bath and Beyond, but they all have the same problem. They all get warm really, really quickly (I’d say about 5 minutes). Furthermore, I find they are far too cold to put on my eyes (eyeball freeze, anyone?). This one is unique because it has a layer of soft, minky-like fabric on the back. Yes, I now own 3 of them! *note: I get a small commission if you buy these through this link.

comfy comfy wrap

This is the actual wrap that was sent to me for review & giveaway. I love love love the super-soft minky fabric on the one side, and the paisley pattern is OH so cute! These are filled with Flaxseed, and can be kept in the freezer for migraines/injuries, or heated up in the microwave! It’s so much longer than other packs, making it my #1 favorite pack (and I have a LOT). Until November 30th, you can even get a 15% discount by going to their site and adding the discount code TESSAG15 at checkout!

Migraine Scarf – This one’s a secret! I’ve picked up a scarf that’s just the right size for tying around your head during a migraine, to help diminish blood flow to the brain during migraines, and also to distract your brain from the pain – pressure, heat, and cold are all time-proven ways to distract or confuse your brain, diminishing the pain signals it receives. I don’t know where I’d be without my scarf!

Good luck everyone! Hope you all find these products as useful as I do! One IMPORTANT NOTE: Grace and Stella has a HUGE sale on right now, and the eye mask and bath rocks are both about 50% off!!! If you want to take advantage of this discount, instead of going through my amazon links, go straight to their web page to order! (I won’t get any commission, but I love you guys that much, and you gotta take advantage of the sale before items are sold out or the sale ends!). Why do I love this company so much? Because they’re awesome, their products are very affordable, and they were featured on The Dragon’s Den!

Managing Irritable Bowel Syndrome (IBS)

For those of you with IBS who are looking for solutions for the gut-wrenching pain, check out this list of natural remedies to help you get through it.

Medication

There are several medications out there, such as Modulon, Dicetel, and Buscopan that work on smooth muscle tissue to stop the painful stomach contractions that go along with an IBS flare-up. Unfortunately, the one that works for a lot of people, Buscopan, has been unavailable for months in Canada, and is not expected to be back for quite a while. If you haven’t tried medication, or need to try something else to replace the Buscopan, see your doctor and explain your situation.

Ginger

Ginger is well-known to help with nausea, but did you know it can also help with nausea and upset stomach caused by IBS? I tried grated ginger in a glass of water, in homemade juices, and I’m sorry, I just hate the stuff. Instead, I buy organic Ginger from the drug store. It really helps with any nausea and I think it also helps with my diarrhea (sorry, but there is no such thing as TMI when it comes to convos about IBS among sufferers!).

Peppermint Oil

Special note here – I’m NOT talking about peppermint essential oils for your temples during a migraine, or for your home diffuser – I’m talking about the capsules. You can pick up a bottle of these babies for around $10, and wow, do they help!

Hot Packs

Using hot packs on your tummy is a great way to help reduce that clenching pain in your stomach – managing pain is often about distraction, and heat and cold are notorious for helping with pain – they actually distract your brain from the pain that you’re feeling, and either reduces it, or, in some cases, eliminate it! I’ll talk more about why that is in an upcoming post on the Pain-Gate Theory of Pain Control. I use hotpacks from Comfy Comfy Canada and until November 30th at midnight, you can actually get one for a 15% discount from them by using my discount code, TESSAG15! I’ll be doing a review and a giveaway of this awesome hot/cold flaxseed pack in October, so stay tuned!

Acidophilous

There are people out there who swear that you absolutely must buy the expensive acidophilous that needs to be refrigerated, or ‘special formulations,’ but I’m here to tell you that even the Shopper’s Drug Mart brand, Life, or the Jamieson brand, from the shelves are just fine! When I’m having a flare-up I take 2 with every meal, or, if I’m not feeling well enough to eat (because everything is going right through me half an hour later anyway) I take 2 of them 3x a day. It’s really and truly incredible that this actually STOPS the pain within an hour of taking it! It’s not a bad idea to include this in your regular routine, to fight off any bad bacteria in your gut that occurs with all that diarrhea. BEWARE of prebiotics though – if you have bad bacteria overgrowth in your intestines, it actually FEEDS off prebiotics, so I avoid them altogether.

The FODMAP Diet

To properly do the FODMAP diet, you’re going to have to do a very serious elimination diet, under the supervision of a Registered Dietician. The FODMAP diet is a diet that aims to reduce the number of high-FODMAP foods that you consume, such as wheat, diary, onions, garlic, legumes, veggies in the cabbage family, artificial sweeteners, and so many more. You may already know some of your triggers, but it’s also important to get tested for gluten sensitivity or intolerence, Celiac, and even lactose intolerence. I personally have always had lactose intolerence, though I can tolerate a small amount of fermented dairy products such as real yogurt and kefir, and I know to stay the hell away from gluten. If you’re really suffering, you may want to consult with a Dietician and find out if you think an elimination diet is right for you.

Is there something that works for you that I haven’t mentioned? Let me know in the comments!

Tornado Warnings – Why you MUST Take Them Seriously, and How to Prepare for Them

Having lived through 2 tornados as of yesterday, and losing 2/3rds of the roof on one house, and everything in the back yard during another tornado, I’ve learned to take the warnings seriously. People laugh at me, but I literally watched as the tornado touched down, and made its way straight to my house, hurling our sheds, trampoline, and our huge Costco play structure through the air, over the fence into the neighbor’s yard in a loop-de-loop.

After that first one, I decided to work on putting together 72-hour emergency backpacks for myself and the kids. When the warning came to my cell phone yesterday, we followed our routine, which is well-practiced by now with all the warnings we’ve had in the past 2 years, and grabbed our backpacks, bedding, and water and headed for the basement.

This time all our neighborhood got was strong winds and a few downed trees, but about 5 minutes away, what you see in the above image from CBC News occurred. This was the neighborhood my soon-to-be daughter-in-law lives in. We went over after it was over last night, and wow, what a wild drive. I’ve never driven through the city with all the power out (it destroyed the local power station). It was so dark, and the streetlights were barely visible, so people would fly through intersections (and I almost did too!) without realizing they’d run a light if there was no cross-traffic. It’s crazy how your brain expects traffic lights to only be lit up, and how hard you have to focus when you’re going through a lot of them when they’re out. Fortunately their house was unscathed, but the neighborhood – what a mess. A gas station had been demolished, and the light pole next to it had gone right through the neighboring house’s roof.

This is the important bit. You may be thinking ‘well everyone who lives in a Tornado zone should be prepared!’ Here’s the catch – we don’t live in an area where tornados normally occur, but there have been more and more warnings and tornados over the past few years, and locals still don’t take these warnings seriously.

Here are some tips to prepare:

Set Up 72-hour Emergency ‘Bug-Out-Bags’

A Bug-out-bag (BOB in prepper speak) is simply some type of bag that has all the essentials in it in case you need to get out. Here’s what’s in our bags (i use small backpacks):

-2 waterproof flashlights, 4 glow sticks, 2 candles

-multiple batteries

-fire-building supplies (waterproof matches, 2 lighters, flint & striker, fire-starter sticks, cotton balls with vaseline on them in a ziploc)

-Cliff bars and Icebreaker Sours (in case we want to freshen our breath)

I have RZ masks for all of us after the wildfires in Alberta (*note you can get these from Amazon as well, as the RZ site doesn’t ship filters to Canada) They come in a wide varietey of colors and patterns, but you definitely want this version of the mask. *note: I get a small percentage of sales from Amazon if you order this product by clicking on the image here. **SPECIAL NOTE! If you go straight to the RZ site they are having a sale on fall color themed masks in red, orange, maroon, and green using the code FALL25! (no, I don’t get any kickbacks from their site, but I’m sharing the info because I love you guys that much!)


An Eton FRX5BT All purpose weather alert radio with bluetooth – this handy little device has lights, a flashlight, a USB port to charge electronics with, can be charged via wall plug, solar panels, or hand crank (for 15-20 minutes of radio play). It can also run on triple-A batteries, or run off an already-charged device like your computer. It gets AM/FM/S.A.M.E. and NOAA radio stations to keep you up to date. This model is water resistant and can handle being dropped.*note: I get a small percentage of sales from Amazon if you order this product by clicking on the image here.


A water-filtering ‘straw’ with collapsible bottle, and water purifying tabs, & 2 bottles of water (I only have one of the ‘straws’ as they last a really long time, and I have a few of the bottles, one for each kid and one for me – but I believe you can use your own collapsible bags. *note: I get a small percentage of sales from Amazon if you order this product by clicking on the image here.


-work gloves, winter gloves, toque, rain poncho, silver ‘blanket’

-survival knife (only 6″ long, but with a rough edge on the back to make kindling for fires)

-a padlock (in case we go to a school where we can store belongings in a locker)

-Fox 40 whistle (work even when wet or cold), flashing light for clothing so we’re visible

-small wet bag (for keeping things like electronics dry)

-KFS (knife, fork, spoon)

-vaseline (to moisten chap lips, cheeks etc.)

-first-aid kit

Make an Emergency Plan

It’s really important for your family to know what to do when that dreaded emergency broadcast signal comes on your phone and other devices. There are recommendations here on how to build an emergency plan for you and your family, as well as lists of what you should pack in your emergency bag and a vehicle emergency bag. Make sure you at least practice what your plan is ahead of time – we have a ‘stay-put’ plan for tornados, which entails moving our bedding to the basement (pillow & blanket) and bringing down the emergency bags and our meds. We also have a ‘ditch’ plan, which entails throwing the kid’s scout bags (which stay packed) in the car along with my sleeping bag, and the bug-out-bags, and going to a shelter or leaving town if necessary. 

Stay CALM

My kids still remember the tornado that destroyed their beloved outdoor equipment, and the very severe damage it did a few streets over (tearing houses in half, tearing whole roofs off strip malls and houses), and they’re terrified when that warning system goes off. So once we get to the basement (as calmly as possible) we break out a board game, and start playing something to keep ourselves distracted. Turning on the radio intermittently (between games) helps us stay apprised of the situation, and lets us know when the warning is over if we get caught with dead cell phones (yesterday, both mine and my son’s cells were at around 10-15%, so they died). Distraction is the key, and we make it into kind of a ‘fun’ time, even though everyone is still inwardly tense. The less we talk about it, the better it is for them.

Wherever you live, if the emergency broadcast system warns you of an unlikely weather event, take it seriously. You never know when your house will be affected.

Writing Course Review for Life in Slow Motion

I recently had the truly blessed opportunity to review a writing course for Esther of the Life in Slow Motion blog. Esther has an MA in Professional Counselling, and does one-on-one in-person counselling in the Baltimore area, in addition to blogging, so this isn’t your average course – it was written from experience and expertise as a writer and Counsellor. I never recommend anything I haven’t tried for myself, and I won’t recommend something that I can’t get behind. *note – as a reviewer, I didn’t pay for the course, it was provided to me free of charge for the purposes of review*

The course I reviewed is called 31 Days of Expressive Writing for Chronic Illness and Pain. Before I delve deeper into what you can expect of this course, I wanted to say a few words about writing and chronic illness/pain. When you are suffering in any way, be it grief, mental pain, or physical pain, distraction is the key to diminishing your misery. Writing is a powerful tool, as it can be therapeutic as an outlet to your thoughts and emotions, and it can also allow you to understand and process these. If you’re a blogger with a chronic illness or chronic pain, you know what I’m talking about. Writing is cathartic. For me, writing comes a little too easily – I tend to be long-winded. For others, it may be more difficult to figure out what they want to say. Either way, writing has become a healthy and wonderful outlet for those who are cooped up, living with chronic illnesses, and/or living with pain.

This course is comprised of a warm ‘welcome’ section, and 6 main sections:

-Your Story; Your Grief and Emotions; Your Faith; Your Relationships; Your Strength, Joy and Hope; and Your Goals.

The course wraps up with a final prompt to get you moving forward.

When I started this course, I didn’t know that a near and dear family member was going to become very ill while undergoing her third round of Chemotherapy for breast cancer. I also didn’t know that she was going to die a week later.

As God’s Perfect Plan always works, she died while I was just starting the section on grief and emotions. My focus changed, and I found that I was more introspective, and my writing responses to the prompts reflected the grief I was going through, both because of her death, and because it made me reflect more on my life and those of my children. While I’m used to writing about what I know about chronic illness and pain to help others, I had never written so directly about what I feel because of it. My own grief, and my own emotions. Her death changed my perspective, and I began writing on a more personal level. I learned to accept who I was, what kind of life I was living, what I had lost as an active triathlete and Personal Trainer, and also reflect on those things that I was grateful for. I learned to accept the things that I couldn’t change, and think about what I could; what kinds of plans I could make for my future, what I could do with a brain injury, Fibromyalgia, migraines, arthritis, and osteoporosis. It brings to mind what my father said to me one day as I was leaving after dinner one day. He had cancer, and had turned down Chemotherapy in favor of a better quality of life. He said, “I don’t ask myself, ‘what can’t I do with cancer,’ but instead, I ask myself ‘what can I do with it?'” He was an active volunteer in the community until a few weeks before he died, which was long after doctors had predicted.

I can’t recommend this course enough, both to chronic illness and pain sufferers, but also to bloggers. I can truly say that this was a life-changing course for me, as the prompts were succinct and really asked the important questions.

Getting back to the course content, each section has several writing prompts, each of which takes around 10-15 minutes to complete. While you could go through the whole course faster than thirty-one days, I strongly recommend that you take your time, and try to do it daily, or at least 5 days a week, to allow you to reflect on your previous writing before starting the next prompt. Whether you are spiritual or not, you will find that responding to the writing prompts somehow brings you to a peaceful place of introspection. Nobody is reading your responses, so you can be as open as you like when you’re writing without fear of judgment.

As a former teacher and Curriculum Coordinator at one of Canada’s top universities, I can say that the course is well-designed, well laid-out, and the progressions are logical and flow well into each other. If you complete this course, blogger or not, I recommend that you get yourself a journal, or start one on your computer, and continue with your writing. For me, this course was very therapeutic, and offered me the opportunity to reflect openly about my own life. The ability to step in closer and truly observe your own thoughts and feelings.

What a wonderful gift it was for me.

What a wonderful gift to give yourself.

Want to try it out? Click here to sign up through my page; I’ll get a small commission, and you’ll be helping me to continue bringing you great content through my blog!

Work Out With Me Wednesday #1

I’m delighted to get started on Work Out With Me Wednesdays! Please always check with your doctor before starting any exercise, and find out whether it’s safe to work out, as well as identify any limitations you may have. I’ve designed this to be for those who are suffering from Chronic Illness and Chronic Pain, so we are starting out very slowly. This is not meant to replace hands-on personal training by a certified trainer, however, I am a Certified Personal Trainer (CPT) with the Canadian Society of Exercise Physiology (CSEP) with lots of experience as a Physical Educator teaching classes and providing Supplementary Physical Training at one of Canada’s top Universities, as well as working as a CPT at the Y, and running my PT business.

Before we delve into today’s workout, I want to clarify what you can get out of these workouts. First, it’s very, very important for you to recognize that your limitations may prohibit you from doing some of these exercises. It’s up to you to choose which exercises you can safely do, and which could exacerbate any condition you may have. For example, I have a bad knee, so I can’t safely do any kind of squat or lunge anymore. DO NOT push your limits. Even the tiniest movements and exercises can exacerbate existing conditions, causing more pain for you, and potentially making an existing injury worse. Since I can’t do proper testing for you before starting your exercises, I am unable to advise you as to what you should, and should not do. Please acknowledge your limitations, and while you may feel great, or think you can do more, if you are just starting out after being sedentary, you really do need to start slow and build slowly.

If you have Fibromyalgia, you may be thinking ‘she’s crazy! I hurt everywhere, I can’t do this!’ Actually, the contrary is true. Exercise is the #1 treatment to reduce the frequency and intensity of flare-ups; be patient – it will take time for your body to get used to moving more, and you won’t notice much change until you’ve progressed to longer, more frequent workouts. Don’t worry – you don’t have to be a runner, or a triathlete to see benefits – but if you used to be a swimmer, it is possible for you to start swimming again, even after years of being sedentary, and it will make you feel so much better!

So, without further ado, here is our first workout, images courtesy of the Physiographe program.

  1. Back Extension and Flexion

If you don’t have a yoga mat or exercise mat, now is the time to get yourself one. If your knees bother you, go for an exercise mat, or use a yoga mat on a carpeted area of your home.

flex-11

You may recognize this exercise as a yoga movement, known as ‘cow’ and ‘cat.’ As you raise your head to get into the first position, breathe out slowly. Then, slowly arch your back like a cat, lowering your head to look at your knees, and breathe in. Repeat this as many times as you think you can; if you’re just starting out, start with three repetitions                                                                                   of each position. Don’t do more than 10 for                                                                                     now.

2. Lower Back Stretch

flex-13
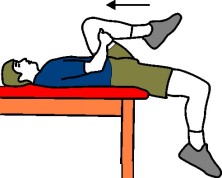
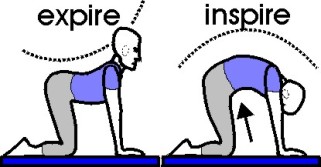
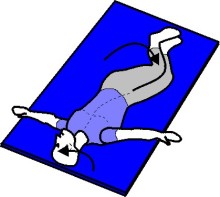
As you perform this exercise, you need to be conscious of two things. First, make sure the small of your back stays as flat on your mat as possible. Secondly, in order to help you achieve this, turn your head to the opposite side as your knees. Get into position with your knees facing one way – hold that position for 30 seconds, breathing slowly. Then, keeping your lower back and shoulders on the mat, slowly rotate to the other side, and hold it for another 30 seconds. If you are just starting to stretch/exercise, 2 repetitions (2 on each side) is more than enough! If you feel a stretch in your hip or outer leg, that’s fine; extend your legs a little more if it’s uncomfortable. None of these positions should cause discomfort, only a stretching sensation.

3. Hamstring/Calf Stretches

flex-21

For this position, you will be laying on the floor, hands behind your head, with your legs at a 90 degree angle to your torso. Slowly bring your toes towards your face until you feel the stretch. You can either hold this position for 20 – 30 seconds, or repeat is slowly, breathing out and counting to 3 slowly as you flex your toes, and breathing in as you slowly return them to a neutral position. If you choose to hold the position for 20 – 30 seconds, do this twice if you’re just starting out. If you choose to repeat it 3-second flex, 3-second relax, start out with 3 repetitions, and go up to 10 if you’ve been more active.

4. Shoulders

flex-30
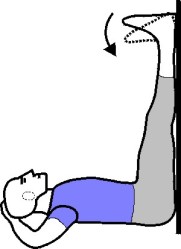
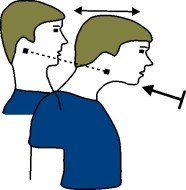
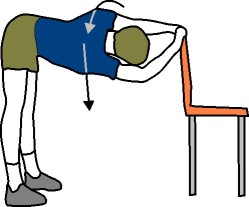
For this one, you will be standing with your back against the wall. Your two main points of focus will be keeping your lower back relaxed, and keeping your shoulder blades together. Your elbows should be at shoulder height to begin, then slowly raise them, keeping a slight bend in your elbows, and then lower to the start position. It is very important to listen to your body as you do this one – again, these positions should not be uncomfortable or painful; you should simply feel the stretch. If you feel a cramping sensation as you do this, don’t raise your arms as high, or stop altogether. As always, use a 1-2-3 count moving your arms up, hold them up for a 3-count, then lower. If you’re just starting out, try doing this at least once, or twice. Otherwise, you can go up to 12 repetitions, as long as it does not hurt.

That’s our quick beginner workout for today! You may feel some tightness or mild muscle aches the next day if you’ve been sedentary, but if you are able to repeat this every other day, this will go away quickly (2-3 days).

You can repeat this mini-workout every day if you’ve been moving around well, or do it every other day if you’re just starting out and find it taxing. However many reps you did the first time, stick to that number for the whole week. Don’t increase reps, however good you feel. The goal right now is to stretch, create body awareness, and slowly strengthen.

See you next Wednesday, and please feel free to email me with any questions you may have, or let me know what you thought of the workout!

Until then, take care! Happy Hump Day everyone!